Recalbox Forum

    • Register
    • Login
    • Search
    • Recent
    • Tags
    • recalbox.com
    • Gitlab repository
    • Documentation
    • Discord

    Recalbox sur TV CRT en RGB

    Recalbox Général
    recalbox crt rgb
    51
    782
    705900
    Loading More Posts
    • Oldest to Newest
    • Newest to Oldest
    • Most Votes
    Reply
    • Reply as topic
    Log in to reply
    This topic has been deleted. Only users with topic management privileges can see it.
    • Link71
      Link71 last edited by

      Bonjour à tous, moi je viens d'acheter un PI2SCART pour jouer en 240p sur trinitron, malgrès avoir regardé plusieurs tuto sur la modification du fichier "conf.txt" sur la carte SD, rien ne s'affiche sur le trinitron mais toujours sur mon écran plat, déjà dans le fichier confg.txt d'origine sans modification il y a déjà une ligne très longue, je ne sais pas si je dois la supprimer et mettre les nouvelles lignes en dessus, ou modifié directement cette ligne, quelqu'un qui utilise un PI2SCART peut il me l'envoyer ou prendre une photo de celui ci...

      1 Reply Last reply Reply Quote 0
      • Link71
        Link71 @idarius last edited by

        @idarius
        Bonjour idarius, j'ai un rasperry 3B+ AVEC PI2SCART, j'ai bien le fichier conf.txt sur ma carte SD, comment doit il être modifié, car il y a déjà une ligne trés longue dedans, et quand je met tes valeurs en dessous rien en s'affiche sur mon crt...

        1 Reply Last reply Reply Quote 0
        • ian57
          ian57 Staff last edited by ian57

          @retrobricoleur @Link71 hello, j'ai un pi2scart de chez smallcab, à l'époque j'avais fait les tests ça fonctionnait. Je peut refaire un test et voir ce qui cloche.
          d'après la doc

          disable_audio_dither=1
          dtparam=audio=on
          dtoverlay=vga666
          enable_dpi_lcd=1
          display_default_lcd=1
          dpi_group=2
          dpi_mode=87
          hdmi_timings=320 1 16 30 34 240 1 2 3 22 0 0 0 60 0 6400000 1#240
          

          peut être dészactiver le spi et l'i2c qui utilise des gpios

          dtparam=i2c_arm=off
          dtparam=spi=off
          

          ne pas oublier de mettre un mode 87 ou default pour le mode global dans le recalbox.conf

          global.videomode=DMT 87 HDMI
          

          ou

          global.videomode=default
          

          Attention aussi de ne pas activer le support gpio des joy et bouton

          controllers.gpio.enabled=0
          

          "UNIX is basically a simple operating system, but you have to be a genius to understand the simplicity." Dennis Ritchie

          retrobricoleur Link71 2 Replies Last reply Reply Quote 0
          • retrobricoleur
            retrobricoleur @ian57 last edited by

            @ian57 j'ai oublié de préciser que j'ai un câble HDMI VGA péritel et pas un pi2scart
            J'ai bien suivi le config.txt et le recalbox.conf et pas de dmt 87, c'est bizarre, ça vient de la version ??

            Du recalbox
            Du crt
            La vie quoi 😎

            ian57 1 Reply Last reply Reply Quote 0
            • Link71
              Link71 @ian57 last edited by

              @ian57 , bonsoir ian57,tout d'abord merci de me répondre, car le périphérique PI2 scart est peu répandu, ceux qui est dommage c'est qu'il y a sur youtube plusieurs video du PI2SCART sous recallbox, mais personne ne propose de pouvoir télécharger le fichier conf.txt.

              J'ai rajouté les lignes que tu as indiqué dans le fichier conf.txt, mais quand je rallume le raspberry (il est branché en hdmi sur un écran de PC et en pi2scart sur Sony trinitron), mais à chaque allumage du raspberry 3B+, seul l'image que l'écran de pc apparait.

              Sincérement c'est désespérant ...

              ian57 1 Reply Last reply Reply Quote 0
              • acris
                acris last edited by acris

                @Link71
                poste ton archive de support.

                1 Reply Last reply Reply Quote 0
                • ian57
                  ian57 Staff @retrobricoleur last edited by

                  @retrobricoleur j'ai utilisé cela (câble HDMI VGA péritel ) sur une borne avec une tv 36 cm et une RB 6.1.1, il n'y avait pas de soucis particulier. J'ai le tuto sur mon wiki, il faut que je le publie sur le wiki RB.

                  Voici le schéma de mon cablage alt text 
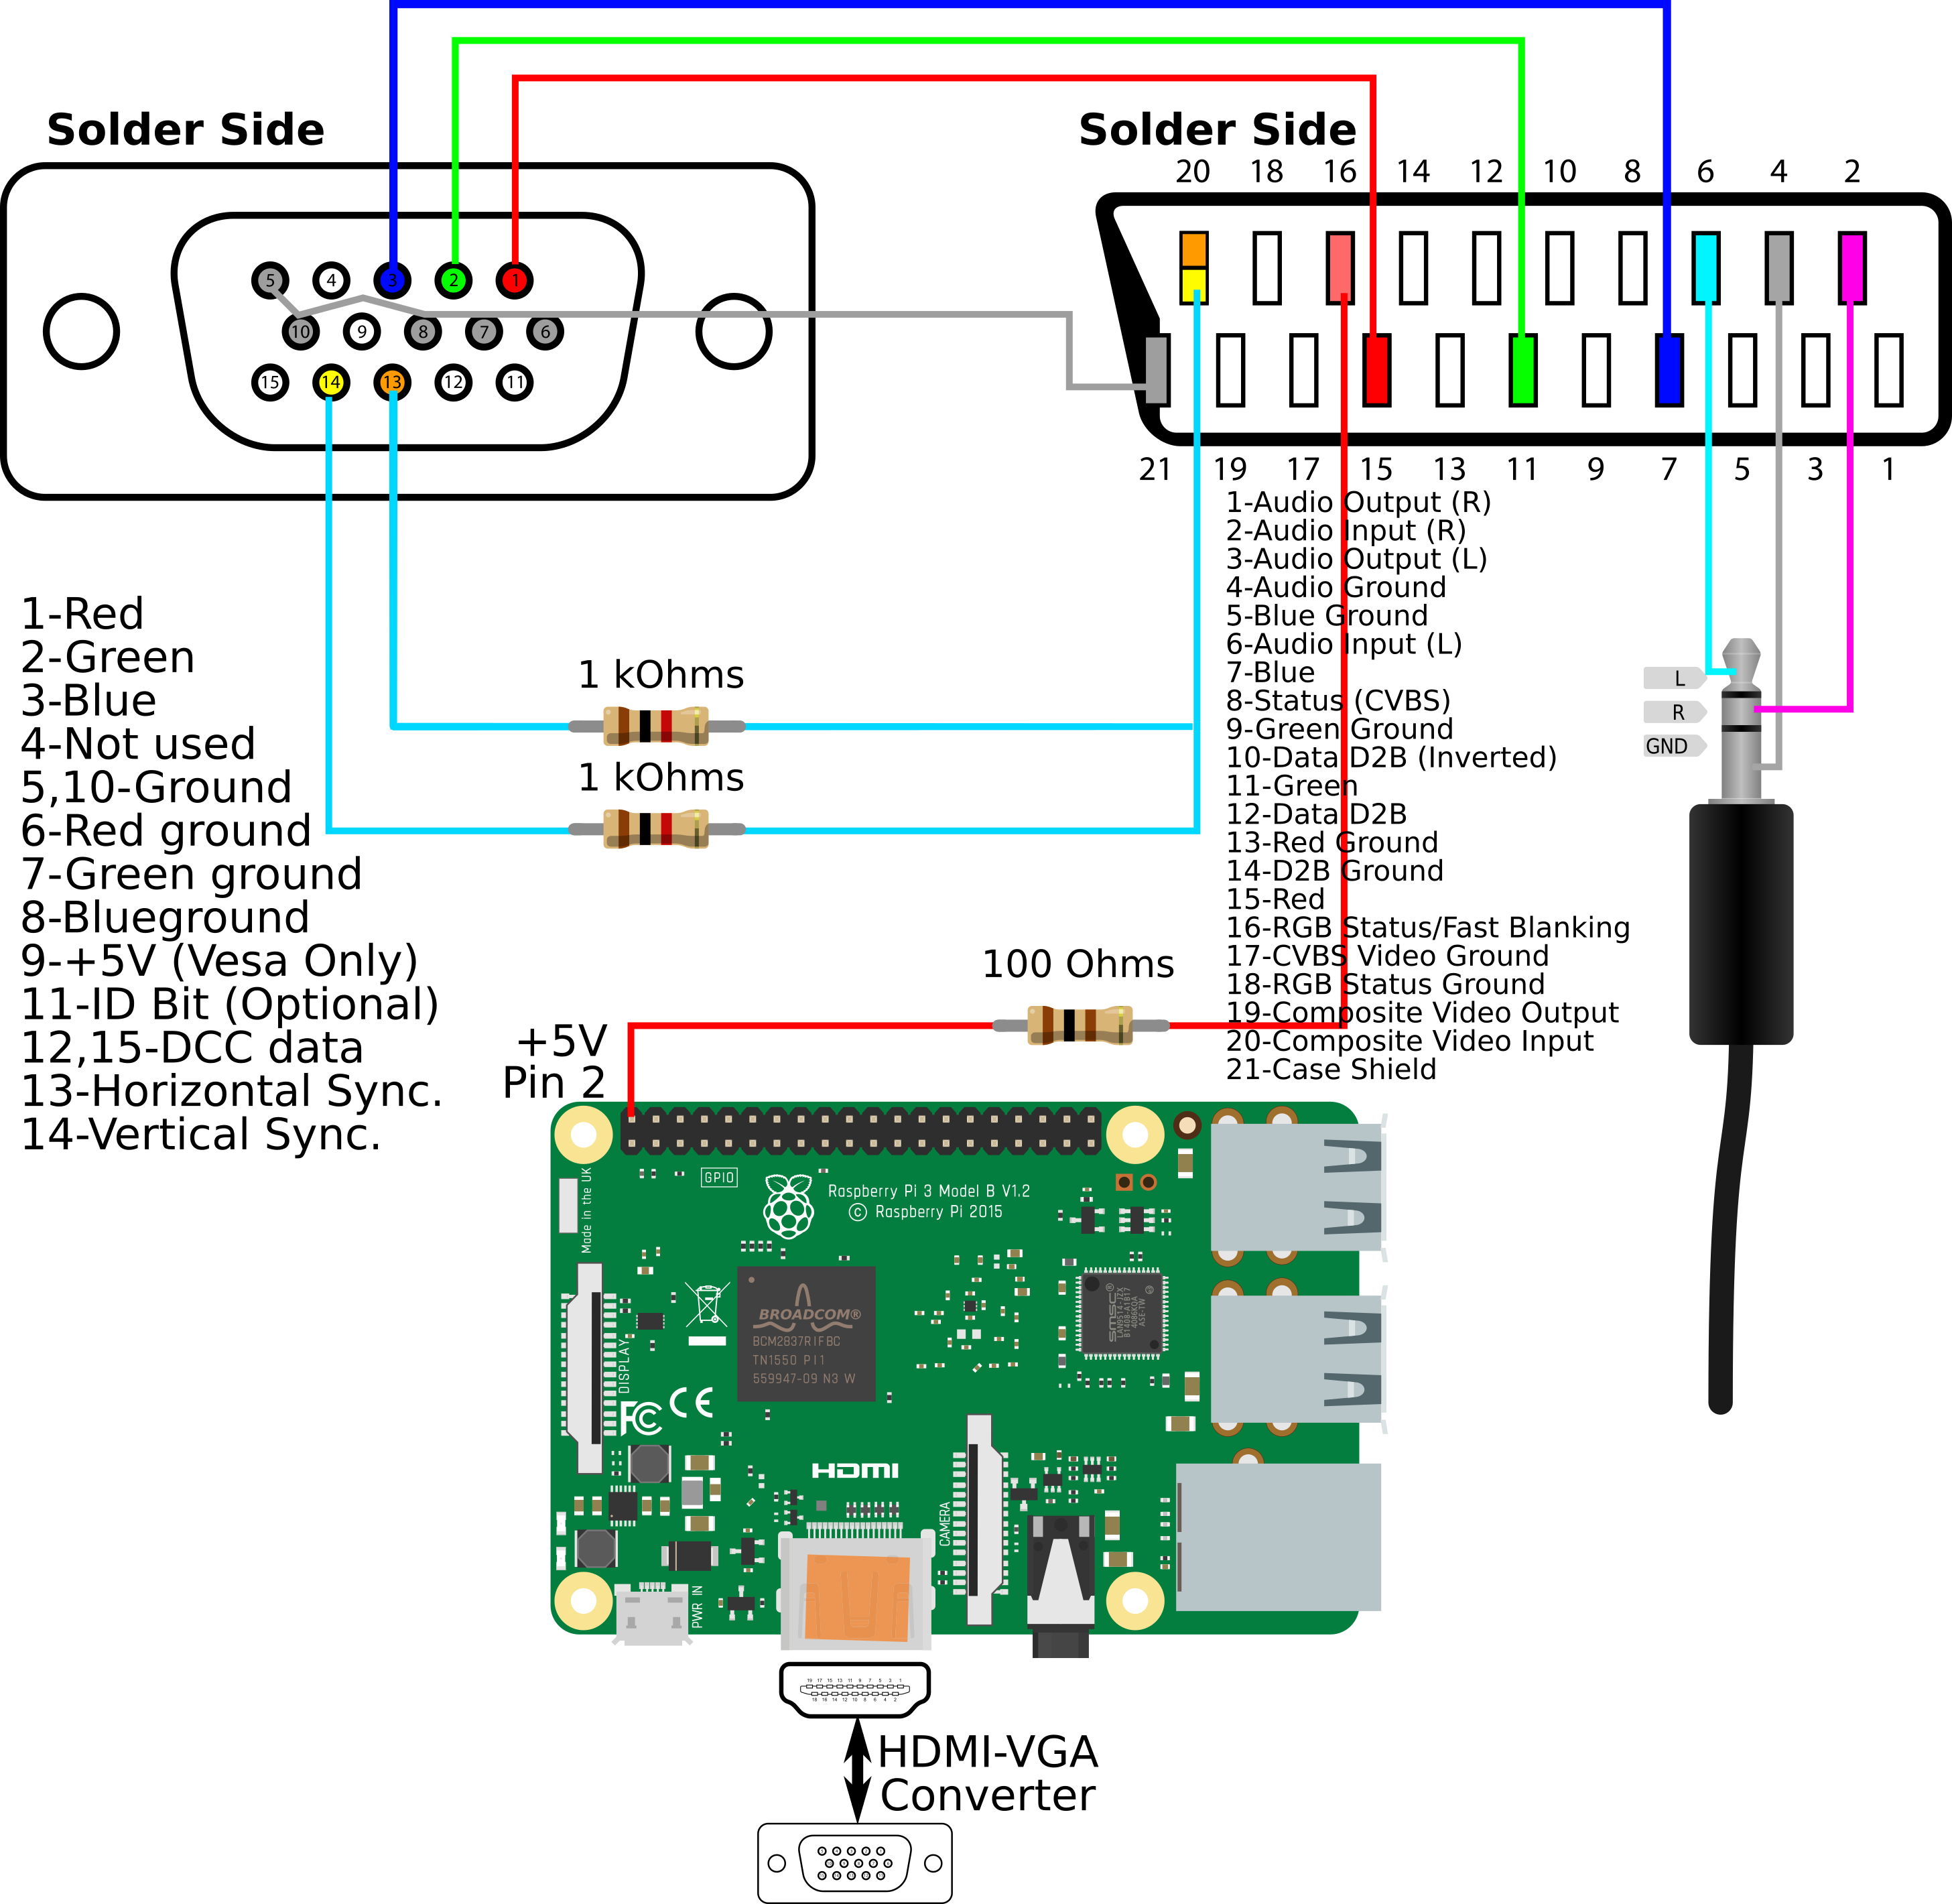
à la sortie du convertisseur vga.

                  ensuite pour les config c'est très différent du VGA666/pi2scart/rgbPi (ils utilisent tous les 3 le dpi en mode 18 bits 6 bits par couleur :
                  Dans le config.txt on configure comme si on avait un ecran 1920x240

                  hdmi_cvt=1920 240 60 1 1 0 0
                  hdmi_disable_edid=0xa5000080 #Enables the ignoring of EDID/display data if your display doesn't have an accurate EDID.
                   
                  hdmi_pixel_encoding=2 #Force the pixel encoding mode. By default it will use the mode requested from edid so shouldn't need changing. 
                  avoid_safe_mode=1
                  disable_overscan=0 #oversan enabled
                  hdmi_drive=2
                  hdmi_group=1
                  hdmi_mode=6
                  hdmi_force=1
                  

                  dans le recalbox.conf on force ES à s'afficher en 480 entrelacé, ça pique un peut les yeux, sinon on utiliser les CEA 8 HDMI un 240 non entrelacé, mais il faudra un thème adapté à cette faible resolution

                  system.es.videomode=CEA 6 HDMI
                   
                  #global.videomode=CEA 4 HDMI
                  global.videomode=DMT 87 HDMI
                  

                  ensuite il faut dire à libretro pour chaque émulateur de n'utiliser d'une partie de la fenetre 1920x240, pour cela il faut créer un fichier de config pour chaque emu : cf https://forum.recalbox.com/topic/18927/recalbox-6-1-sur-écran-crt/9 à placer dans /share/system/configs/retroarch

                  Par exemple mon megadrive.cfg

                  aspect_ratio_index = "23"
                  custom_viewport_width = "1792"
                  custom_viewport_height = "224"
                  custom_viewport_x = "104"
                  custom_viewport_y = "16"
                  

                  il faut adapter les 4 dernière ligne en fonction de la géométrie de l'ecran. Il est possible de trouver les valeurs en reglant depuis le menu de retroarch

                  si cela n'est pas fait, l'image de l'émulateur sera complètement écrasée au milieu de l'écran.

                  "UNIX is basically a simple operating system, but you have to be a genius to understand the simplicity." Dennis Ritchie

                  Link71 1 Reply Last reply Reply Quote 0
                  • ian57
                    ian57 Staff @Link71 last edited by

                    @link71 je n'ai pas eu le temps de faire de test ce soir. Que se passe 'il si tu ne branche pas l'HDMI et seulement le crt sur le pi2scart? Après mes tests etait avec un pi3 et pas un pi3+, ya peut être eu des changements

                    "UNIX is basically a simple operating system, but you have to be a genius to understand the simplicity." Dennis Ritchie

                    1 Reply Last reply Reply Quote 0
                    • retrobricoleur
                      retrobricoleur last edited by

                      Merci pour les infos..
                      Tiens tu mets 23 à aspect ratio alors qu'on conseille 22 ?

                      Du recalbox
                      Du crt
                      La vie quoi 😎

                      1 Reply Last reply Reply Quote 0
                      • acris
                        acris last edited by acris

                        c'est 23 maintenant il y a un ratio de plus qui a été ajouté à retroarch depuis quelques versions.
                        donc si 22 ne fonctionne pas , mettre 23

                        voir les surcharges pour certaines choses https://recalbox.gitbook.io/documentation/v/francais/utilisateur-avance/surcharge-de-configuration

                        retrobricoleur 1 Reply Last reply Reply Quote 0
                        • retrobricoleur
                          retrobricoleur @acris last edited by

                          @acris merci beaucoup, effectivement j'ai un peu lâché les mise à jour car tout fonctionnait bien (j'aime pas changer quand ça marche).
                          Je ferai un essai à midi pendant la pause.
                          J'espère que ça va fonctionner car ça me manque de pas tater mon crt de 33" 😁

                          Du recalbox
                          Du crt
                          La vie quoi 😎

                          1 Reply Last reply Reply Quote 0
                          • retrobricoleur
                            retrobricoleur last edited by retrobricoleur

                            Bon ça fonctionne pas et en plus le raspberry ne se lance plus. J'ai dû toucher un truc qui fallait pas..
                            Je regarderai ça à tête reposée demain.

                            Du recalbox
                            Du crt
                            La vie quoi 😎

                            1 Reply Last reply Reply Quote 0
                            • Link71
                              Link71 last edited by

                              Ian57, le Raspberry est branché en hdmi et PI2SCART (péritel), quand les 2 câbles sont branchés simultanément, le son sort de mon trinitron TV mais l'image et affiché sur mon écran de PC. Recalbox fonctionne correctement, mais l'image et sur l'un et le son sur l'autre...

                              Quant le Raspberry est branché uniquement en PI2SCART donc cable hdmi enlevé, le son sort de mon trinitron TV mais pas d'image sur l écran du PC.

                              1 Reply Last reply Reply Quote 0
                              • Link71
                                Link71 @ian57 last edited by acris

                                @ian57 après avoir mis toutes les lignes que tu me donnes pour le fichier conf.txt voici une copie du fichier (recalbox fonctionne) mais aucune image sur le CRT.

                                Je précise que l'image de recalbox 6.1.1. à été installé sur une micro SD, et j'utilise une clé USB pour tout ce qui est roms et émulateur, tous les tests que je fais sont donc sans clé usb, une fois que tout fonctionnera bien avec la micro sd , je m'attaquerai a la clé pour configurer les émulateurs, voici mon fichier conf.txt :

                                il est de plus en plus long ...

                                uncomment if you get no picture on HDMI for a default "safe" mode
                                #hdmi_safe=1
                                
                                disable_overscan=1
                                
                                uncomment to force a specific HDMI mode (this will force VGA)
                                dpi_group=2
                                dpi_mode=8
                                # dpi_output_format=6
                                dpi_mode=87
                                # audio_pwm_mode=2
                                # hdmi_cvt=1920 240 60 1 1 0 0
                                # hdmi_timings=320 1 10 20 54240 1 6 8 10 0 0 0 60 0 6400000 1#240
                                # Sound output. Set to 0 or comment for autodetect, 1 for DVI, 2 to force HDMI.
                                hdmi_disable_edid=0xa5000080 
                                # display_default_lcd=1
                                hdmi_drive=2
                                hdmi_pixel_encoding=2 
                                # Using /etc/modules is deprecated and no longer supported on 4.4 kernel
                                So manually enable audio
                                dtparam=audio=on
                                
                                force hdmi while the tv can take time before sending the signal on the hdmi output
                                hdmi_force_hotplug=1
                                
                                uncomment for composite PAL
                                #sdtv_mode=2
                                
                                uncomment for lirc-rpi
                                enable_dpi_lcd=1
                                # avoid_safe_mode=1
                                dtoverlay=vga666
                                hdmi_group=1
                                # hdmi_mode=6
                                # hdmi_force=1
                                #if you plug your tv at the same time as your rpi and that the rpi switches from the hdmi or give a low resolution because tv had no enough time to initialize it
                                boot_delay=3
                                
                                dtparam=i2c_arm=off
                                dtparam=spi=off
                                uncomment if you don't want the rainbow at startup
                                disable_splash=1
                                
                                default CEC name
                                cec_osd_name=recalbox
                                
                                Overclock
                                gpu_mem_256=128
                                gpu_mem_512=256
                                gpu_mem_1024=448
                                
                                avoid_safe_mode=1
                                
                                kernel=zImage
                                
                                ian57 1 Reply Last reply Reply Quote 0
                                • ian57
                                  ian57 Staff @Link71 last edited by

                                  @link71 il est tout pourri ton config.txt d'après ce que je lis, pas étonnant que ça boote pas. Il faut faire attention à la syntaxe

                                  "UNIX is basically a simple operating system, but you have to be a genius to understand the simplicity." Dennis Ritchie

                                  1 Reply Last reply Reply Quote 0
                                  • acris
                                    acris last edited by

                                    @Link71
                                    merci de ne pas multiplier les demandes de support dans différents sujets
                                    https://forum.recalbox.com/topic/19939/tutoriel-pi2scart-tv-crt

                                    1 Reply Last reply Reply Quote 0
                                    • ian57
                                      ian57 Staff last edited by ian57

                                      @Link71 Bon ben ya surement un truc que tu ne fais pas bien!

                                      0_1580286487901_IMG_20200129_090446.jpg

                                      0_1580286459041_IMG_20200129_090508.jpg

                                      0_1580286475659_IMG_20200129_090558.jpg

                                      voici mon config.txt :

                                      # uncomment if you get no picture on HDMI for a default "safe" mode
                                      #hdmi_safe=1
                                      
                                      disable_overscan=1
                                      
                                      # uncomment to force a specific HDMI mode (this will force VGA)
                                      #hdmi_group=1
                                      #hdmi_mode=1
                                      
                                      # Sound output. Set to 0 or comment for autodetect, 1 for DVI, 2 to force HDMI.
                                      #hdmi_drive=2
                                      
                                      # Using /etc/modules is deprecated and no longer supported on 4.4 kernel
                                      # So manually enable audio
                                      dtparam=audio=on
                                      
                                      config_hdmi_boost=0
                                      
                                      # force hdmi while the tv can take time before sending the signal on the hdmi output
                                      hdmi_force_hotplug=1
                                      
                                      # uncomment for composite PAL
                                      #sdtv_mode=2
                                      
                                      # uncomment for lirc-rpi
                                      #dtoverlay=lirc-rpi
                                      
                                      # if you plug your tv at the same time as your rpi and that the rpi switches from the hdmi or give a low resolution because tv had no enough time to initialize it
                                      boot_delay=3
                                      
                                      # uncomment if you don't want the rainbow at startup
                                      disable_splash=1
                                      
                                      # default CEC name
                                      cec_osd_name=recalbox
                                      
                                      # Overclock
                                      gpu_mem_256=128
                                      gpu_mem_512=256
                                      gpu_mem_1024=448
                                      
                                      avoid_safe_mode=1
                                      
                                      kernel=zImage
                                      
                                      # Raise the first security limit up to 70° instead of 60°
                                      temp_soft_limit=70
                                      
                                      #HDMI-VGA-SCART config commented
                                      
                                      #force to jack audio at boot
                                      #hdmi_ignore_edid_audio=1
                                      #hdmi_drive=1
                                       
                                      #increase jack sound quality
                                      #audio_pwm_mode=2
                                       
                                      #hdmi_cvt=1920 240 60 1 1 0 0
                                       
                                      #hdmi timings ironic
                                      #hdmi_timings=460 1 22 51 80 282 1 6 6 19 0 0 0 51 0 9600000 1
                                      #hdmi_group=2
                                      #hdmi_mode=87
                                       
                                      #hdmi_cvt=1920 288 50 1 1 0 0
                                      #hdmi_cvt=1920 288 60 1 1 0 0
                                      #hdmi_disable_edid=0xa5000080 #Enables the ignoring of EDID/display data if your display doesn't have an accurate EDID.
                                       
                                      #hdmi_pixel_encoding=0 default       (limited for CEA, full for DMT)
                                      #hdmi_pixel_encoding=1 RGB limited   (16-235)
                                      #hdmi_pixel_encoding=2 RGB full      ( 0-255)
                                      #hdmi_pixel_encoding=3 YCbCr limited (16-235)
                                      #hdmi_pixel_encoding=4 YCbCr full    ( 0-255)
                                       
                                      #hdmi_pixel_encoding=2 #Force the pixel encoding mode. By default it will use the mode requested from edid so shouldn't need changing. 
                                       
                                      #avoid_safe_mode=1
                                       
                                      # uncomment this if your display has a black border of unused pixels visible
                                      # and your display can output without overscan
                                      #disable_overscan=1
                                       
                                      # uncomment the following to adjust overscan. Use positive numbers if console
                                      # goes off screen, and negative if there is too much border
                                      ##overscan_left=32
                                      ##overscan_right=32
                                      #overscan_top=18
                                      #overscan_bottom=4
                                       
                                      #hdmi_drive=2
                                      #hdmi_group=1
                                      #hdmi_mode=6
                                      #hdmi_force=1
                                      
                                       #overclocking deactivated for test
                                      #arm_freq=1350
                                      #core_freq=500
                                      #sdram_freq=575
                                      #force_turbo=0
                                      #over_voltage=4
                                      #over_voltage_sdram_p=6
                                      #over_voltage_sdram_i=4
                                      #over_voltage_sdram_c=4
                                      #gpu_freq=500
                                      #sdram_schmoo=0x02000020
                                      
                                      #overscan_scale=1
                                      
                                      #PiSCART config
                                      dtparam=i2c_arm=off
                                      dtparam=spi=off
                                      
                                      disable_audio_dither=1
                                      dtparam=audio=on
                                      dtoverlay=vga666
                                      enable_dpi_lcd=1
                                      display_default_lcd=1
                                      dpi_group=2
                                      dpi_mode=87
                                      hdmi_timings=320 1 16 30 34 240 1 2 3 22 0 0 0 60 0 6400000 1 
                                      #240
                                      

                                      et mon recalbox.conf dans lequel j'ai juste changé global.videomode=default

                                      # System Variable
                                      # You can configure your recalbox from here
                                      # To set a variable, remove the first ; on the line


                                      # ------------ A - System Options ----------- #
                                      #    Uncomment the system.power.switch you use
                                      ;system.power.switch=ATX_RASPI_R2_6      # http://lowpowerlab.com/atxraspi/#installation
                                      ;system.power.switch=MAUSBERRY           # http://mausberry-circuits.myshopify.com/pages/setup
                                      ;system.power.switch=REMOTEPIBOARD_2003  # http://www.msldigital.com/pages/support-for-remotepi-board-2013
                                      ;system.power.switch=REMOTEPIBOARD_2005  # http://www.msldigital.com/pages/support-for-remotepi-board-plus-2015
                                      ;system.power.switch=WITTYPI             # http://www.uugear.com/witty-pi-realtime-clock-power-management-for-raspberry-pi
                                      ;system.power.switch=PIN56ONOFF          # https://github.com/recalbox/recalbox-os/wiki/Add-a-start-stop-button-to-your-recalbox-(EN)
                                      ;system.power.switch=PIN56PUSH           # https://github.com/recalbox/recalbox-os/wiki/Add-a-start-stop-button-to-your-recalbox-(EN)
                                      ;system.power.switch=PIN356ONOFFRESET    # https://github.com/recalbox/recalbox-os/wiki/Add-a-start-stop-button-to-your-recalbox-(EN)
                                      ;system.power.switch=PIN356PUSHRESET     # https://github.com/recalbox/recalbox-os/wiki/Add-a-start-stop-button-to-your-recalbox-(EN)
                                      
                                      ## fbcp FrameBuffer Copy Program
                                      ## For small TFT screen on GPIO and SPI
                                      ## See https://github.com/recalbox/recalbox-os/wiki/Utility---Use-of-fbcp-for-small-TFT-screen-%28EN%29 for details
                                      ## Needed for Waveshare 3.2" 3.5" TFT screen, 2.8" Adafruit screen
                                      ## See https://github.com/recalbox/recalbox-os/wiki/TFT-Screen-SPI-Bus-%28EN%29
                                      ## for support and configuration details needed by /boot/config.txt
                                      system.fbcp.enabled=0
                                      
                                      ## Splash screen duration
                                      ## 0: Video will be played for 20 seconds (default)
                                      ## -1: All the video will be played (it won't be stopped automatically)
                                      ## >0 : Time before the video will be stopped (in seconds)
                                      system.splash.length=0
                                      
                                      ## Recalbox Manager (http manager)
                                      system.manager.enabled=1
                                      ## Currently, only version 2 is available
                                      system.manager.version=2
                                      
                                      ## Recalbox security
                                      # enforce security
                                      # samba password required
                                      # disable virtual gamepads
                                      system.security.enabled=0
                                      
                                      ## Recalbox API (REST)
                                      system.api.enabled=0
                                      
                                      ## Allow a specific resolution for ES only from the command : tvservice -m [MODE]
                                      ## Leave commented for the default usual behaviour
                                      #system.es.videomode=CEA 4 HDMI
                                      #system.es.videomode=DMT 87 HDMI
                                      system.es.videomode=CEA 6 HDMI
                                      
                                      ## EmulationStation
                                      ### menu style
                                      ### default -> default all options menu
                                      ### none -> no menu except the game search menu
                                      ### bartop -> less menu, only needed for bartops
                                      emulationstation.menu=default
                                      ### Select a system to show on boot (use rom directory name) (string)
                                      emulationstation.selectedsystem=favorites
                                      ### Show the gamelist of the first or selected system on boot (0,1)
                                      emulationstation.bootongamelist=0
                                      ### Disable system view. ES will boot and show ONLY the first or selected system (0,1)
                                      emulationstation.hidesystemview=0
                                      ### Pa**e Gamelists only. Show only games listed in gamelist.xml files (0,1)
                                      emulationstation.gamelistonly=0
                                      ### Force basicgameList view to be displayed, even if your game systems are scraped (0,1)
                                      emulationstation.forcebasicgamelistview=0
                                      
                                      ## Videosnaps
                                      ### Delay before videosnaps start, in millisecond. Default: 2s
                                      ;emulationstation.videosnaps.delay=2000
                                      ### Video loop times. 0 = no video. 1 or more = the video loops x times before fading out
                                      ;emulationstation.videosnaps.loop=1
                                      
                                      ## Scrapers
                                      ### ScreenScraper.fr
                                      ### Force media region - if not defined, region is taken from system.language. Default: us
                                      ;scraper.screenscraper.region=eu
                                      ### Force text language - if not defined, region is taken from system.language. Default: en
                                      ;scraper.screenscraper.language=fr
                                      ### Choose the media to download among:
                                      ### screenshot: game screenshot
                                      ### title     : game title screenshot
                                      ### box2d     : Front case
                                      ### box3d     : 3D rendered case
                                      ### mixv1     : Recalbox special mix image V1 (default)
                                      ### mixv2     : Recalbox special mix image V2
                                      ;scraper.screenscraper.media=mixv1
                                      ### ScreenScraper account
                                      ;scraper.screenscraper.user=
                                      ;scraper.screenscraper.password=
                                      
                                      ## Emulator special keys
                                      ## default -> default all special keys
                                      ## nomenu -> cannot popup the emulator menu
                                      ## none -> no special keys in emulators
                                      system.emulators.specialkeys=default
                                      
                                      ## Show or hide kodi in emulationstation (0,1)
                                      kodi.enabled=1
                                      ## Start kodi at launch (0,1)
                                      kodi.atstartup=0
                                      ## set x button shortcut (0,1)
                                      kodi.xbutton=1
                                      
                                      ## Allow a specific resolution for Kodi only from the command : tvservice -m [MODE]
                                      ## By default is using the default resolution of your screen
                                      kodi.videomode=default
                                      
                                      ## Kodi can wait for a network component before starting
                                      ## waithost is the ip or hostname that must answer to a ping to validate the availability
                                      ## waittime is the maximum time waited when kodi boots
                                      ## if waitmode is required, kodi will not start if the component is not available
                                      ## if waitmode is wish, kodi will start if the component is not available
                                      ## if waitmode is not set or has another value, kodi will start immediately
                                      ;kodi.network.waitmode=required
                                      ;kodi.network.waittime=10
                                      ;kodi.network.waithost=192.168.0.50
                                      
                                      ## Hyperion
                                      ## Hyperion allows you to use an ambilight like led system on your recalbox
                                      ## Use hypercon to create your configuration file, and copy it in /recalbox/share/system/configs/hyperion/hyperion.config.json
                                      hyperion.enabled=0
                                      
                                      
                                      # ------------ B - Network ------------ #
                                      ## Set system hostname
                                      system.hostname=RECALBOX
                                      ## Activate wifi (0,1)
                                      wifi.enabled=0
                                      ## Set wifi region
                                      ## More info here: https://github.com/recalbox/recalbox-os/wiki/Wifi-country-code-(EN)
                                      wifi.region=US
                                      ## Wifi SSID (string)
                                      ;wifi.ssid=new ssid
                                      ## Wifi KEY (string)
                                      ## after rebooting the recalbox, the "new key" is replace by a hidden value "enc:xxxxx"
                                      ## you can edit the "enc:xxxxx" value to replace by a clear value, it will be updated again at the following reboot
                                      ## Escape your special chars (# ; $) with a backslash : $ => \$
                                      ;wifi.key=new key
                                      
                                      ## Wifi - static IP
                                      ## if you want a static IP address, you must set all 3 values (ip, gateway, and netmask)
                                      ## if any value is missing or all lines are commented out, it will fall back to the
                                      ## default of DHCP
                                      ;wifi.ip=manual ip address
                                      ;wifi.gateway=new gateway
                                      ;wifi.netmask=new netmask
                                      
                                      # secondary wifi (not configurable via the user interface)
                                      ;wifi2.ssid=new ssid
                                      ;wifi2.key=new key
                                      
                                      # third wifi (not configurable via the user interface)
                                      ;wifi3.ssid=new ssid
                                      ;wifi3.key=new key
                                      
                                      ## Samba share
                                      system.samba.enabled=1
                                      ### Virtual Gamepads
                                      system.virtual-gamepads.enabled=1
                                      ### SSH
                                      system.ssh.enabled=1
                                      
                                      # ------------ C - Audio ------------ #
                                      ## Set the audio device (auto, hdmi, jack)
                                      audio.device=auto
                                      ## Set system volume (0..100)
                                      audio.volume=90
                                      ## Enable or disable system sounds in ES (0,1)
                                      audio.bgmusic=1


                                      # -------------- D - Controllers ----------------- #
                                      # Enable support for standard bluetooth controllers
                                      controllers.bluetooth.enabled=1
                                      # Enable ERTM
                                      controllers.bluetooth.ertm=0
                                      
                                      
                                      ## Please enable only one of these
                                      # -------------- D1 - PS3 Controllers ------------ #
                                      ##Enable PS3 controllers support
                                      controllers.ps3.enabled=1
                                      ## Choose a driver between bluez, official and shanwan
                                      ## bluez -> bluez 5 + kernel drivers, support official and shanwan sisaxis
                                      ## official -> sixad drivers, support official and gasia sisaxis
                                      ## shanwan -> shanwan drivers, support official and shanwan sisaxis
                                      controllers.ps3.driver=bluez
                                      
                                      
                                      # ------------ D2 - GPIO Controllers ------------ #
                                      ## GPIO Controllers
                                      ## enable controllers on GPIO with mk_arcarde_joystick_rpi (0,1)
                                      controllers.gpio.enabled=0
                                      ## mk_gpio arguments, map=1 for one controller, map=1,2 for 2 (map=1,map=1,2)
                                      controllers.gpio.args=map=1,2
                                      ## Custom mk_gpio arguments,
                                      ## map=5 gpio1=Y-,Y+,X-,X+,start,select,a,b,tr,y,x,tl,hk  for one controller,
                                      ## map=5 gpio1=pin1,pin2,pin3,.....,pin12,pin13
                                      ## map=5,6 gpio1=Y-,Y+,X-,X+,start,select,a,b,tr,y,x,tl,hk gpio2=Y-,Y+,X-,X+,start,select,a,b,tr,y,x,tl,hk for 2 (map=5,map=5,6)
                                      ## map=5,6 gpio1=gpiox,gpioy,gpioz,.....,gpiou,gpiov gpio2=gpiox,gpioy,gpioz,.....,gpiou,gpiov
                                      # where gpiox,gpioy,gpioz ... are NOT pin numbers on the connector, BUT location gpio numbered as in 
                                      # https://www.raspberrypi-spy.co.uk/wp-content/uploads/2012/06/Raspberry-Pi-GPIO-Layout-Model-B-Plus-rotated-2700x900.png
                                      ## Set pin to -1 to disable it
                                      # controllers.gpio.args=map=5,6 gpio=4,17,27,22,10,9,25,24,23,18,15,14,2 gpio2=11,5,6,13,19,26,21,20,16,12,7,8,3
                                      ## MCP configuration : GPIO and MCP can be used together. You can mix them.
                                      ## map=0x20,0x21 for 2 mcp23017 on i2c bus
                                      #controllers.gpio.args=map=0x20,0x21,5,6 gpio=4,17,27,22,10,9,25,24,23,18,15,14,-1 gpio2=11,5,6,13,19,26,21,20,16,12,7,8,-1


                                      # ------------ D3 - Steam Controllers ------------ #
                                      ## Enable steam controller service
                                      controllers.steam.enabled=0
                                      
                                      
                                      ## DB9 Controllers
                                      ## Enable DB9 drivers for atari, megadrive, amiga controllers (0,1)
                                      controllers.db9.enabled=0
                                      ## db9 arguments
                                      controllers.db9.args=map=1
                                      
                                      ## Gamecon controllers
                                      ## Enable gamecon controllers, for nes, snes, psx (0,1) 
                                      controllers.gamecon.enabled=0
                                      ## gamecon_args
                                      controllers.gamecon.args=map=1
                                      
                                      ## XGaming's XArcade Tankstik and other compatible devices
                                      controllers.xarcade.enabled=1


                                      # ------------ F - Language and keyboard ------------ #
                                      ## Set the language of the system (fr_FR,en_US,en_GB,de_DE,pt_BR,es_ES,it_IT,eu_ES,tr_TR,zh_CN)
                                      system.language=fr_FR
                                      ## set the keyboard layout (fr,en,de,us,es)
                                      system.kblayout=fr
                                      ## Set you local time
                                      ## Select your timezone from : ls /usr/share/zoneinfo/ (string)
                                      ;system.timezone=Europe/Paris


                                      # ------------ G - UPDATES ------------ #
                                      ## Automatically check for updates at start (0,1)
                                      updates.enabled=1
                                      # Update type : default to stable
                                      updates.type=stable
                                      
                                      
                                      # ------------ H - HERE IT IS - GLOBAL EMULATOR CONFIGURATION ------------ #
                                      ## The global value will be used for all emulators, except if the value
                                      ## is redefined in the emulator
                                      
                                      ## Set game resolution for emulators
                                      ## select your mode from the command : tvservice -m [MODE]
                                      ## CEA 5 HDMI : 1920x1080 @ 60Hz 16:9, clock:74MHz interlaced 
                                      ## CEA 4 HDMI : 1280x720 @ 60Hz 16:9, clock:74MHz progressive
                                      ## use 'default' for using the default resolution
                                      ## use 'auto' : switches to CEA 4 HDMI if supported, else keep the current resolution
                                      ## (string)
                                      #global.videomode=CEA 4 HDMI
                                      #global.videomode=DMT 87 HDMI
                                      global.videomode=default
                                      
                                      ## Shader set 
                                      ## Automatically select shaders for all systems
                                      ## (none, retro, scanlines)
                                      global.shaderset=none
                                      
                                      ## Once enabled, your screen will be cropped, and you will have a pixel perfect image (0,1)
                                      global.integerscale=0
                                      
                                      ## Set gpslp shader for all emulators (prefer shadersets above). Absolute path (string)
                                      global.shaders=
                                      
                                      ## Set ratio for all emulators (auto,4/3,16/9,16/10,custom)
                                      global.ratio=auto
                                      
                                      ## Set smooth for all emulators (0,1)
                                      global.smooth=1
                                      
                                      ## Set rewind for all emulators (0,1)
                                      global.rewind=1
                                      
                                      ## Set autosave/load savestate for all emulators (0,1)
                                      global.autosave=0
                                      
                                      ## Enable retroarchievements (0,1)
                                      ## Set your www.retroachievements.org username/password
                                      ## Escape your special chars (# ; $) with a backslash : $ => \$
                                      global.retroachievements=0
                                      global.retroachievements.hardcore=0
                                      global.retroachievements.username=
                                      global.retroachievements.password=
                                      
                                      ## Set retroarch input driver (auto, udev, sdl2)
                                      ## If you don't have issues with your controllers, let auto
                                      global.inputdriver=auto
                                      
                                      ## If you do not want recalboxOS to generate the configuration for all emulators (string)
                                      ;global.configfile=/path/to/my/configfile.cfg
                                      
                                      ## Demo screensaver parameters
                                      ## Set the system list from which ES will run random games.
                                      ## Empty list or unexisting key means all available systems
                                      global.demo.systemlist=3do,amigacd32,atari2600,atari5200,atari7800,daphne,fba_libretro,fds,gamegear,gba,lynx,mame,mastersystem,megadrive,neogeo,nes,ngpc,pcengine,sega32x,sg1000,snes
                                      ## Default demo game sessions last 90s. Change this value if you want shorter or longer sessions
                                      ;global.demo.duration=90
                                      ## Default game info screen duration lasts 6s. Change this value if you want shorter or longer info screens.
                                      ;global.demo.infoscreenduration=6
                                      
                                      ## Retroarch AI Translation service
                                      ## Comment out or set to 0 the following key if you don't want the AI service
                                      global.translate=1
                                      ## Set the source and the target languages.
                                      ## Allowed language list: EN, ES, FR, IT, DE, JP, NL, CS, DA, SV, HR, KO, ZH_CN, ZH_TW, CA, BG, BN, EU, AZ, AR, SQ,
                                      ##                        AF, EO, ET, TL, FI, GL, KA, EL, GU, HT, IW, HI, HU, IS, ID, GA, KN, LA, LV, LT, MK, MS,
                                      ##                        MT, NO, FA, PL, PT, RO, RU, SR, SK, SL, SW, TA, TE, TH, TR, UK, UR, VI, CY, YI
                                      ## Setting the translate.from key to a specified language may speed up or give more accurate results
                                      ## If translate.to key is commented, the default value is extracted from system.language or, if system.language is
                                      ## undefined, set to auto (=EN).
                                      global.translate.from=auto
                                      global.translate.to=auto
                                      ## zTranslate API Key
                                      ## go to https://ztranslate.net and create an account.
                                      ## validate your account, then log in and go to the settngs page
                                      ## Look for the API Key at the bottom of the page, then uncomment the following key and paste your API Key:
                                      ;global.translate.apikey=YOUR_API_KEY_HERE
                                      ## Other translation service
                                      ## If you want to use another translation service or a custom API call, use this key to
                                      ## specify the url to call. If the key is not empty, it is used instead of zTranslation's API Key
                                      ;global.translate.url=
                                      
                                      ## Arcade metasystem
                                      ## Activate the Arcade metasystem to group all games from piFBA, FBN (libretro), MAME and optionally Neogeo
                                      ## into a single "Arcade" system.
                                      ;global.arcade=1
                                      ## You may want to specify its position in the system list. (Default: 0)
                                      ## Negatives values may be used to tart from the end (-1 = last position)
                                      ;global.arcade.position=0
                                      ## Include NeoGeo or not (default: 1)
                                      ;global.arcade.includeneogeo=1
                                      ## Hide included system or leave them in the system list (default: 1)
                                      ;global.arcade.hideoriginals=1
                                      
                                      
                                      # ------------ I - EMULATORS CHOICES ----------- #
                                      ## You can override the global configurations here
                                      ## Here is the snes example
                                      ;snes.videomode=CEA 4 HDMI
                                      snes.core=snes9x2010
                                      ;snes.shaders=/recalbox/share/shaders/shaders_glsl/mysnesshader.gplsp
                                      ;snes.ratio=16/9
                                      ;snes.smooth=0
                                      ;snes.rewind=1
                                      ;snes.autosave=0
                                      ;snes.emulator=libretro
                                      ;snes.integerscale=0
                                      ## If you do not want recalboxOS to generate the configuration for the emulator: 
                                      ;snes.configfile=/path/to/my/configfile.cfg
                                      
                                      ## Default cores for RPi3
                                      snes.core=snes9x2010
                                      
                                      ## NeoGeo emulator 
                                      ## You can use pifba or a libretro core (fba2x,libretro)
                                      neogeo.emulator=libretro
                                      ## If you set libretro as neogeo.emulator, the line below sets the retroarch core (fbneo, mame2000)
                                      neogeo.core=fbneo
                                      
                                      ## N64 emulator is configured to display a screen with a 640x480 resolution (native n64 resolution)
                                      ## So you must use one of these video modes (DMT 4 HDMI,CEA 1 HDMI).
                                      ## If your screen is not compatible with one of these video modes, please check the recalbox's wiki.
                                      n64.videomode=DMT 4 HDMI
                                      ## If you are using a CRT screen, please change the setting above with this one : 
                                      # n64.videomode=default
                                      
                                      ## Dreamcast emulator
                                      ## Like N64, such a CPU intensive emulator needs a small resolution
                                      ## Consider DMT 4 HDMI (640*480) or DMT 9 HDMI (800*600). If you have a black screen on dreamcast, try DMT 9 HDMI here
                                      dreamcast.videomode=DMT 4 HDMI
                                      
                                      ## Demo screensaver parameters
                                      ## Include or exclude a particular system from the demo screensaver
                                      ## You may change the global.demo.systemlist key or include/exclude every single system
                                      ;snes.demo.include=0
                                      ## Set the session duration for a particular system
                                      ;snes.demo.duration=90
                                      
                                      # ------------ J - NETPLAY PARAMETERS ----------- #
                                      ## All these values are handled by Recalbox itself
                                      global.netplay=1
                                      global.netplay.nickname=
                                      global.netplay.port=55435
                                      global.netplay.relay=
                                      global.netplay.systems=fba_libretro,mame,mastersystem,megadrive,neogeo,nes,pcengine,sega32x,sg1000,snes,supergrafx
                                      global.netplay.lobby=http://lobby.libretro.com/list/
                                      
                                      ## Configurations generated by Recalbox


                                      Si ça marche pas vérifie ton cable péritel, certain sont des "fake" et n'utilise pas le rgb mais le composite, ouvre les prises peritel et verifie que le rgb soit cablé.

                                      Normalement au boot du pi, ta tv doit passer automatiquement en mode AV, si ce n'est pas le cas force en mode AV avec la télécommande ou les boutons.

                                      Si tout est ok, et que tu n'as toujours pas d'affichage alors peut être que le module piscart a un souci...

                                      "UNIX is basically a simple operating system, but you have to be a genius to understand the simplicity." Dennis Ritchie

                                      Link71 3 Replies Last reply Reply Quote 0
                                      • retrobricoleur
                                        retrobricoleur last edited by

                                        et tu crois que je peux abuser pour avoir un config.txt et recalbox.conf pour le hdmi vga peritel ?
                                        d'ailleurs pourquoi il n’apparaît plus directement le recalbox.conf, y a le config et le reste mais pas ce fichier, il n'y a que recalbox-backup.
                                        j'ai pourtant pas hiberné pendant un siècle...

                                        Du recalbox
                                        Du crt
                                        La vie quoi 😎

                                        ian57 1 Reply Last reply Reply Quote 0
                                        • ian57
                                          ian57 Staff @retrobricoleur last edited by

                                          @retrobricoleur un debut de wiki https://github.com/recalbox/recalbox-os/wiki/Connect-your-recalbox-to-a-CRT-with-HDMI-and-SCART-(EN)

                                          "UNIX is basically a simple operating system, but you have to be a genius to understand the simplicity." Dennis Ritchie

                                          retrobricoleur 2 Replies Last reply Reply Quote 0
                                          • retrobricoleur
                                            retrobricoleur @ian57 last edited by

                                            @ian57 alors le problème, c'est pour ça que j'ai l'impression que je suis une quiche, c'est que je sais pas s'il faut supprimer le reste ou le rajouter à un endroit précis.
                                            Pourquoi je n'ai pas de recalbox.conf ?
                                            Quand je lance tv service pour les dmt ou les CEA je n'ai ni le CEA 8 ni le dmt 87.
                                            Désolé de faire mon boulet mais à l'époque je mettais pas autant pris la tête

                                            Du recalbox
                                            Du crt
                                            La vie quoi 😎

                                            1 Reply Last reply Reply Quote 0
                                            • First post
                                              Last post

                                            Want to support us ?

                                            65
                                            Online

                                            99.6k
                                            Users

                                            28.1k
                                            Topics

                                            187.1k
                                            Posts

                                            Copyright © 2021 recalbox.com