Home Button Project
-
Hi everybody! I'm new to this forum and this is my "housewarming offer".
Few years ago, when I build my arcade, I've left a small space for a Home Button in the center of the controller's box. It's a dedicated button would should return to Recalbox's games' select menu. However, since I needed to think about a circuit to isolate the Raspberry's +3.3v Start and Select pins (it's not possible just "join" both wires in a third button without loosing their individual functions), I decided to handle this implementation later.
This year, after a party (before the covid crisis ;D ), I decided that my arcade really needed a Home Button indeed. Not all guests knew that pressing Start + Select would return to initial menu (in fact it's not something really obvious for casual players).
So I decided to share with you this simple solution.
Project cost: <$2 USD+/- (in Brazilian Real something near R$6).List of components:
- 2 units - SPDT 5V relay;
- 1 unit - 10k ohm resistor
- 1 unit - 1N4007 diode or similar (in fact you may place one for each relay);
- 1 unit - PNP transistor
About the List: I used components I already owned here; it's possible (and cheaper) to replace the relay components for a transistor-only scheme if you know electronics.
Desirable: a small universal pcb; it's also possible to fix the components over a cardbox or a wooden card (or whatever-solid you have there with you). The base is not so important since you mantain the components apart each other.
My setup:
Raspberry Pi 3 B+ with Recalbox; using (Player-1) controller's Start and Select (hotkey) to return to Home Screen; using the GPIO pins for Player 1 and Player 2; inside an arcade cabinet (built by myself). However, this circuit works for any kind of controller (if you need to shrink there is still the transistor-remodeling option I told before).Schematics:
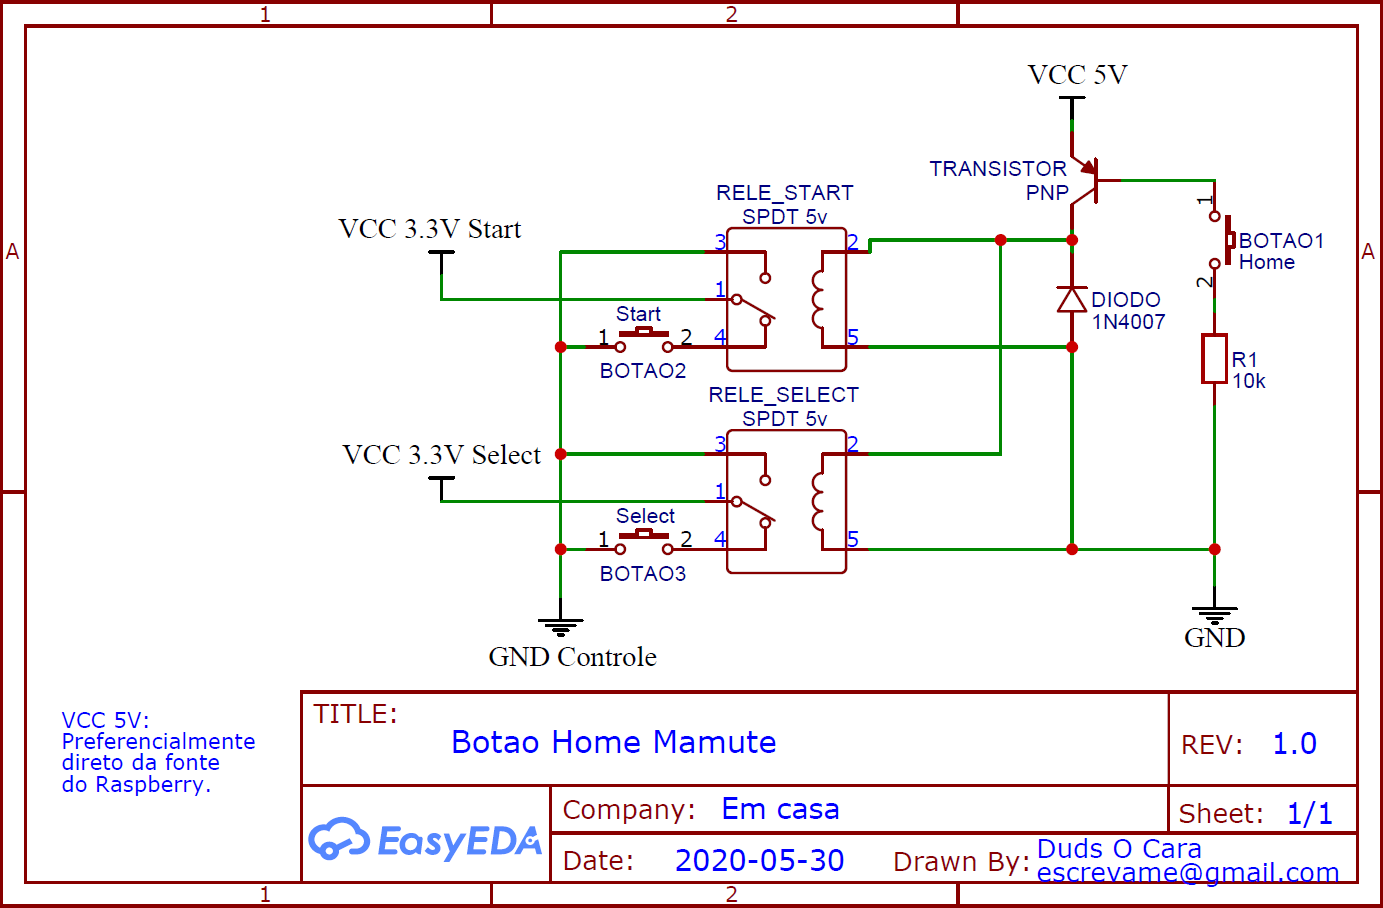
VCC 5V: I'd rather using the Raspberry source instead of the 2/4 GPIO pins.
Tinkercad simulation:
https://www.tinkercad.com/things/9ap3I2M21wsVideo: Circuit I've build (functional) - PORTUGUESE
https://www.youtube.com/watch?v=FTBdr8fgu2A
PS.: terrible soldering abilities alert.Video: Working proof: Home Button running during a game - PORTUGUESE
https://www.youtube.com/watch?v=1hJHnYA5F_QThat's all folks.
===========
This post's translation was an idea of @Zing.Original post (PORTUGUESE): https://forum.recalbox.com/topic/20851/projeto-botão-home-retorno-para-a-seleção-de-jogos
Projeto Fliperama Mamute 4-Players: 99% concluído
****Status: Falta fixar o cinzeiro (sim, todo fliperama de boteco tem que ter um).Próximo projeto
****Xerxes Savage Catuaba Project - Mesa de Pinball Eletromecânica/eletrônica. -
@Duds_O_Cara said in Home Button Project:
However, since I needed to think about a circuit to isolate the Raspberry's +3.3v Start and Select pins (it's not possible just "join" both wires in a third button without loosing their individual functions)
Maybe I'm missing something but why is it not possible to do that ?
-
@AgedLove Because you'll fall in this case below:

Notice that point A, which is Start Vcc, is equal than point B , which is Select Vcc (which is also the Home Button positive pole). There is no difference if you press Start, Home or Select: all of them will trigger the Start+Select action.
Raspberry working
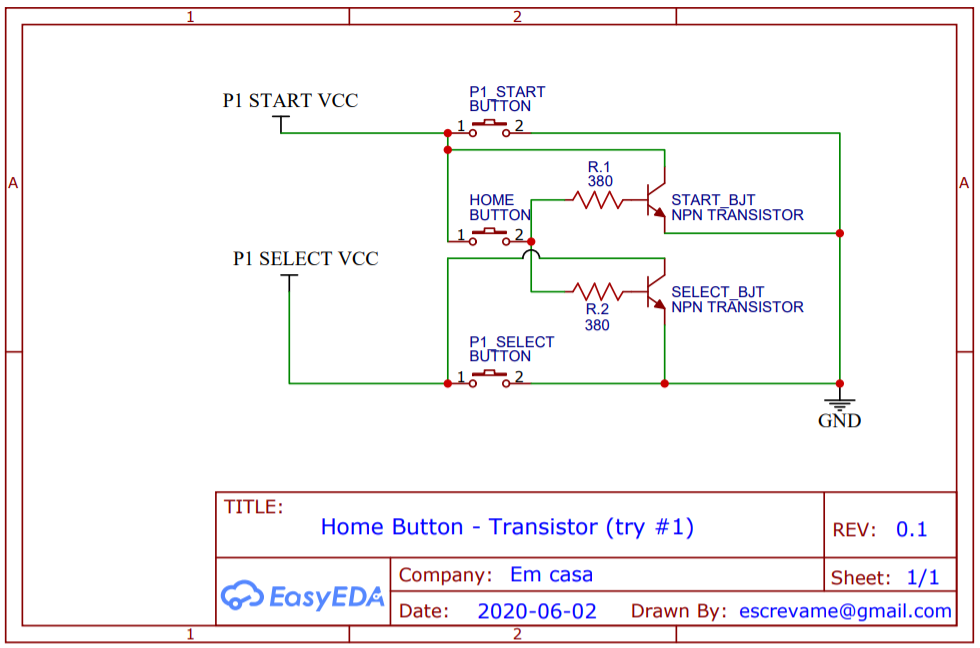
First it's important to know how Raspberry code works. Like many others processors (or microcontrollers like atmegaxxx, picxxx, etc), the Raspberry uses a common Ground (or "Negative") for all buttons and many output ports with High tension (high voltage, +3.3V or "Positive") for each individual button. These ports are called Input Pullup Output Ports. When users press the button, it makes sure the ports touch the Ground, and the processor notes that voltages falling individually. So what we are looking for here is a way to connect both Select and Start GPIO ports to GND without leaving them touch each other (separating each positive until it's time to touch ground).The common answer for this problem is to implement an H-Bridge based circuit, which can be built using relays, transistors or regular buttons (a serie of them). Since what we don't want is pressing more than one button to go back home screen, it's only possible to solve this problem using the relays or transistors components (usually).
H-Bridge Concept: usually uses buttons, relays or transistors

However, when I first build my arcade cabinet, I looked for this crazy button below:

Notice that it isolates points A and B and only connect them both with ground (at the same moment) whem the user presses the Home Button. It's the best answer!
There is only one problem: I created (imaginated) this button concept by myself and never found anything similar to sell in real world (at least at the electronic stores within my city).
So I realized that was easier to answer the problem using existing components to create an H-Bridge than building a new kind of button. And that is the project of this thread.
")
Projeto Fliperama Mamute 4-Players: 99% concluído
****Status: Falta fixar o cinzeiro (sim, todo fliperama de boteco tem que ter um).Próximo projeto
****Xerxes Savage Catuaba Project - Mesa de Pinball Eletromecânica/eletrônica. -
@Duds_O_Cara said in Home Button Project:
Input Pullup Output Ports
Please ignore the word “output”. Or place a slash (Input Pullup / Output Ports). Usually a port is input(in this case input pullup +3.3V) or output.
-
@Duds_O_Cara hi! This might be a different, probably easier, way of achieving this:
https://github.com/recalbox/recalbox-os/wiki/RetroArch-Network-Commands-(EN)
If your question was answered, please mark it as solved: Topic Tools -> Ask a question + Topic Tools -> Mark as Solved
-
@paradadf Hmmm that's interesting! So we could create some code for a button which sends a signal to return Home via UDP network commands through retroarch.
More than that, your link gave me an idea!
I'll put this idea in my project list for the future: find a way to use these UDP network commands to create a Board Button which allows users to select a game just pressing buttons. So I'd connect this board by the side of the arcade cabinet in parties' days and each button should be aside a logo picture of a game, like this:

This way guests could select the most common games just pressing one button, without browsing complicated menus.
This is why I love forums. The most important are the ideas.
Projeto Fliperama Mamute 4-Players: 99% concluído
****Status: Falta fixar o cinzeiro (sim, todo fliperama de boteco tem que ter um).Próximo projeto
****Xerxes Savage Catuaba Project - Mesa de Pinball Eletromecânica/eletrônica. -
@Duds_O_Cara configgen has already a very simple way of launching games I believe. It is used by the webmanager to launch games as far as I can remember.
But I really don't remember more than that. Maybo someone else reads this and remmeber how it is suppose to be... -
@paradadf I think you can just execute the configgen command used by emulationstation to start the game you want, but it may be more difficult. Also @Duds_O_Cara, I think you can use transistors to remove the "switching" noise, typical on relays.
Staff ScreenScraper & Skraper's new developer
-
@redblueflame said in Home Button Project:
Also @Duds_O_Cara, I think you can use transistors to remove the "switching" noise, typical on relays.
Yeah, it's really possible! In fact, a few cents cheaper since transistors are cheaper than relays. In my case, I used some relays that I bought for my IoT testing and an old PNP Transistor. It's also possible do it using mosfet or other components "key-like".
But I'll tell you: I love the relay noise
 (in fact, when I build my pinball machine I'll use as many as possible of the most louder relays in order to recreate the old school sounds).
I think a cheap shematic using transistors only should look like this:
I used tinkercad to validate:
https://www.tinkercad.com/things/jKHnLiFRhBVIn fact if I'd build it to myself I think I should add a third transistor and pull it's base source feeding from the Raspberry 5V source trying to isolate the Home Button circuit from the GPIO pin ciruit, like I did with the relay project, so the GPIO pins wouldn't be in charge of operating the transistors. That would be something like this:
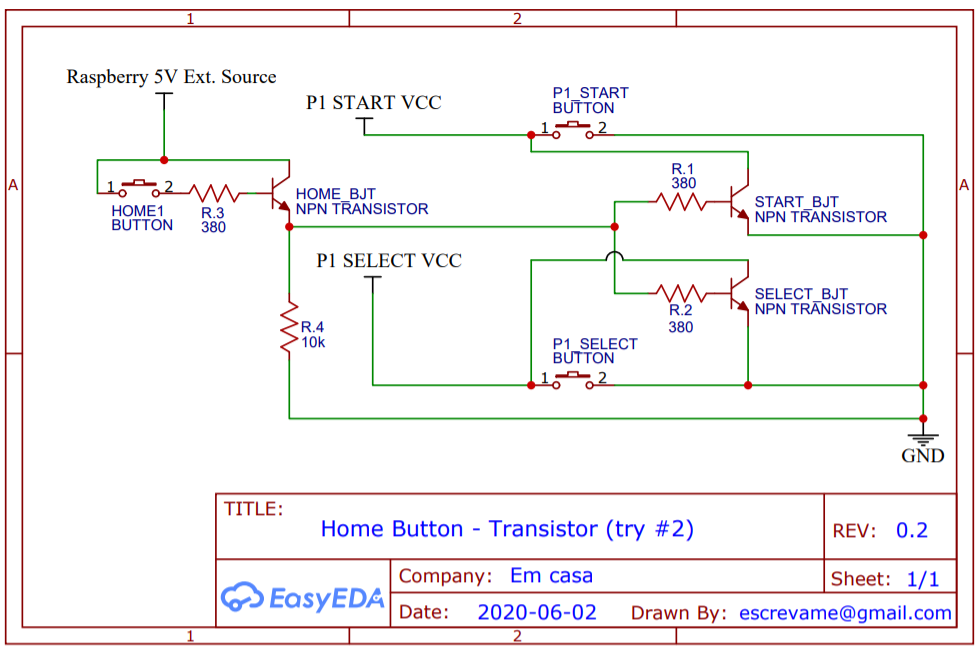
Tinkercad validation:
https://www.tinkercad.com/things/0MSJcpwArDVBut I cannot grant it's working with the real Raspberry since I don't have any transistors here to mount a breadboard right now. Maybe I could try this one day.
What do you think about this schematic? Would this run along with Raspberry?
